We all know what toasters do. We’ve been eating toast since our mommas cut it diagonally to make butterfly shapes on our plates.
Grain mills are new to many people. How do you choose the right electric grain mill when you aren’t even sure what you’re doing with bread baking yet?
Well, I’ve been baking and teaching for a long time, and I have a few opinions!
Why Get An Electric Grain Mill
I have said it in a million classes, that every preparedness-minded person buying a hand-crank grain mill needs an electric one too.
Start baking bread now, when you will benefit from the years of nutrition it provides, and when you do not have the concern of learning how in an emergency situation where your resources are limited. It’s just not reasonable to think you will learn how to bake bread then, with no stove or running water, or name-your-emergency that would lead you to pull out the hand-crank mill.
Why? Because the kernel is stripped and separated into three parts; only the endosperm is being sold to you as “wheat.”
I’ve written extensively about what the FDA requires for something to be called “whole wheat,” and it is not what you are getting when you choose to mill your grain at home. I hear health stories from people constantly, about how many difficulties have cleared up since switching to homemade bread made with freshly ground wheat. Our family has a few stories of our own. And when we cheat—when I drop off from bread baking, we all feel it!
Electric Grain Mill Options
There are a lot of electric grain mills on the market, and this is not an exhaustive list. I have been a serious bread baker since 2008; I’ve taught a lot of classes on bread baking and I’ve been in people’s homes where I’ve been able to try a few different models.
Here’s my personal opinion on a few:
Le Equip is LOUD.
Like airport-runway-loud. This was my first mill. I bought it because it was cheap and I thought my husband would kill me if I made a serious investment into bread-baking, not really knowing if I’d stick with it.
It was LOUD! The babies would cry. The dog would howl. And my husband finally made me mill my grain outside. In North Carolina rain and in Montana winter. Sometime years later, I had to get hearing aids for hearing loss for unknown reasons (I always wondered….) I have heard the same complaint about Blendtec (and it’s the same design as the old Le Equip).
Kitchen Aid Grain Mill Attachment
It’s such a wonderful concept, is it not? At one point, it was a fantastic option if you already owned the Kitchen Aid Mixer. But if you don’t, it isn’t cost-effective. And if you own a newer one, you’ll probably join the list of people who complain that you cannot mill much at a time.
Nutrimill.
These are great grain mills, I’ve only ever “borrowed” one. Still a little loud and difficult to find a place for it in a small kitchen, it’s the same size as the Wondermill. I have compared it to my favorite mill, the Wondermill, but I still recommend the…
Wondermill.
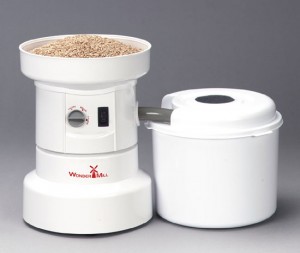
Awesomeness. It claimed for years to be the quietest mill on the market, and it was obvious for a long time that it was. It has an easy-to-clean design, and the canister can also be used for storage. What always set it apart for me from the Nutrimill, though, was the customer service. I work with a lot of companies and Wondermill is the best of them all. In fact, we sell the Wondermill, and for years it was the only mill I would ever consider selling, just because of its perfect combination of product and customer service.
But this brings me to what I thought I’d never say…
I have a new favorite mill.
My Experience with Mockmill
When Mockmill called and asked if I’d like to review their mill, I felt disloyal to Wondermill initially, having been an authorized dealer for Wondermill since 2011.
But to be fair to our customers, it seemed right to try the newer products on the market, too. So let me be forthright about what I stand to gain from this review: I make more money selling Wondermill (as an authorized dealer) than if you buy a Mockmill from any links provided in this email, although Pantry Paratus is now an affiliate.
I think Pantry Paratus will consider becoming an authorized dealer in the future, though!
Streamlined Mill with Small Countertop Footprint
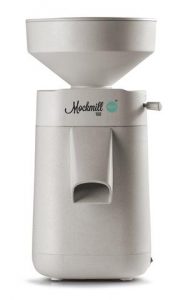
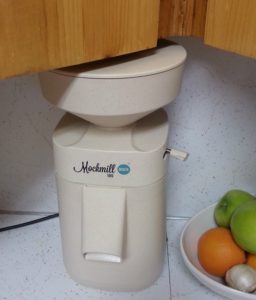
Unless you are using a grain mill attachment (and Mockmill has one, by the way), I know of no other grain mill with such a small countertop footprint. Grain mills require either plenty of counter space or plenty of cupboard space, but they all require plenty. I’ve got a small kitchen countertop, and the Mockmill has a new home on it, always available for a quick cup of flour here or there as I need it, always fresh.
I’ve mentioned before that because of the high level of oils found within home-milled flour, you need to either use the flour immediately or freeze it. Because other mills are so big and cumbersome, most people mill for the whole week (or two), and then clean their mill and store it. With the Mockmill, I can have fresh flour every single time, because it takes less room than my blender would, far less than my toaster.
I also have low cupboards, and it’s a perfect fit under them!
Now, if I’m going to get really picky, I will say that I wanted my Lucky Baking Bowl to fit underneath. Sigh. But other bowls did, and I don’t have to clean out the Mockmill like I do with other electric grain mills. So it’s a trade-off.
Design Simplicity and Grinding Stones
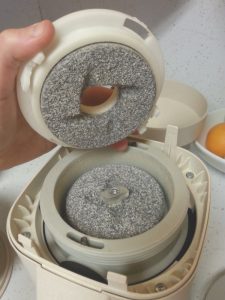
I was impressed with the simplicity of the design, and I saw the stones themselves. By the way, the Wondermill using micronizing technology whereas the Mockmill uses stones just like the Wonder Junior Deluxe Hand Crank Mill. If you like the idea of stones, you’d prefer Mockmill. Neither mill overheats the grain.
Mockmill states that their ceramic stones are “near-diamond” in their hardness and that they’ll last forever. I’m not worried. Even if they didn’t for some reason, they are very easy to get to in the machine and remove. The stones clean themselves as they are used and are hard enough to last.
Intimidated by Instructions to Open Up Housing
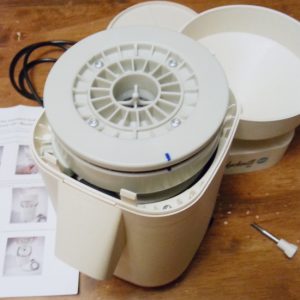
It came with instructions requiring I open up the mill, because for shipping there were two braces inserted to keep the stones from shifting. Well huh…I won’t lie that this really intimidated me. You would never open up the housing on the Nutrimill or Wondermill. You can get them serviced, but you wouldn’t get into them yourself. So I followed the instructions, removed those two braces, and assembled as they’d instructed. I put grain in and turned it on. It didn’t mill. When I opened it back up, I realized I simply didn’t screw on a piece as tightly as instructed. Then it worked like a charm and I am now confident in how to open and service my own machine if I ever needed to do so. I actually came to like that.
Lower Grain Amounts
I bake with about 14 cups of flour at a time. The Mockmill can handle it. But it is more of a countertop model and I cannot find where they’ve studied the volume it can produce at one time. I know that Wondermill is proven to produce 100 pounds of flour per hour, and they’ve done some crazy endurance testing with it. Both mills are rated for home use, but if you plan on using your mill for a cottage industry of selling bread at the farmer’s market, you should go Wondermill. If, instead, you’re looking to have a weekly baking day or a way to whip up some brownies, you might prefer the small countertop footprint of the Mockmill that lets you keep the mill at hand.
With that said, I have the Mockmill 100. The Mockmill 200 has a greater grinding capacity. Check it out.
The Mockmill is Quiet
I really want to say that the Mockmill is quieter than the Wondermill, but that’s coming from a deaf girl. Hubby mentioned it too, though, so that’s something!
The Mockmill has a 6-Year Warranty
‘Nuff said. But then again, the Wondermill has a lifetime warranty. Both machines are easily fixable, but I cannot really see how or why anyone would need to fix either machine. In eight years of selling Wondermill, I’ve never had a call to get a machine fixed. And I’m super-impressed with the Mockmill’s sturdy frame and build. I think you’re good, either way.
My conclusion is this: I’m happy with either the Wondermill, or potentially the Nutrimill, and definitely happy with the Mockmill. Of the three, the Mockmill is hands-down my favorite. It’s practical: takes little room, is easy to clean, and is quiet.
Just to help you out, I’ve created a comparison sheet between my 2 favorite mills. In the end, we might prioritize our needs differently. If you have any questions about what is right for you, don’t hesitate to email us at customer <at> pantryparatus.com!
And if you are considering the Wondermill, you can get it here, from Pantry Paratus. If you are considering the Mockmill, you can get one here using our link and it helps us earn a couple bucks.
A Note About Our Mockmill Coupon Code:
Update: 2023-09 – Unfortunately we can’t offer a MockMill coupon code any longer. =(
We used to refer people to Mockmill with a coupon code, we unfortunately don’t have access to that anymore, but if you purchase after clicking our link it helps use keep the lights on: simply click this link instead.

