Many of you may have gardens littered with fallen trees from strong winds or lightning. What are you going to do with all these fallen trees? The simple answer is: make firewood. There are certainly many alternatives to firewood in this day-and-age, such as gas and electricity. However, firewood is a very budget-friendly source of fuel in comparison to gas and oil. You may feel unsure of the how to turn fallen trees into neatly-chopped firewood. If this is the case, then this article was written especially for you!
Tools and Safety Equipment for Making Firewood
There are a few tools that you’re going to need to help you cut the tree and split the wood. To be specific, a chainsaw, an iron wedge, a plastic wedge, a sledge hammer, and splitting maul are necessary.
The chainsaw can be an electric one or have a gas engine. The advantages of electric chainsaws are that they are lightweight, and effective in cutting small limbs and logs. The disadvantage is that the electric cord may prevent you from moving far from the power source. This is why a gas chainsaw may be a better option in terms of both portability and cutting purposes. For home use, a chainsaw with a bar length of 16 inches is sufficient. A chainsaw like this can be purchased from manufacturers such as Stihl and Husqvarna, Poulan, Homelite, Echo, and McCulloch. In terms of chainsaws, price and quality are often linked. A more expensive chainsaw will often be more durable or have a more powerful cut than a cheaper one. Carefully consider the amount of wood that needs to be cut and how hardy the chainsaw needs to be before purchasing one.
 For wood splitting, iron wedges and a sledge hammer will help you to divide logs into smaller pieces. The sledge hammer will pound the iron wedge into the wood and split it apart. A splitting maul serves the same purpose as a sledge hammer, and is more frequently used. Plastic wedges, however, are not for splitting wood but are rather inserted into partially-cut logs just above the chainsaw blade to prevent the log from pinching the chainsaw. If you accidentally touch the wedge with the chainsaw blade, the plastic wedge will not damage the chain. This tool is particularly helpful when cutting medium to large logs.
If you have a large amount of wood to split, an automatic wood splitter is a very efficient tool to use. It means that you don’t need to manually split the wood, saving you a lot of time and effort. Purchasing and maintenance costs are fairly high, so renting is a viable option.
For safety reasons, you need protective equipment. Equipment like boots, goggles, and gloves are necessary, as well as a long-sleeved shirt and pants. It is advisable to wear hearing protection and a face shield while working with a chainsaw. Once you are fully kitted-out with protective gear, log cutting can begin.
Cutting logs
Log cutting isn’t as simple as you may imagine it to be. If the entire tree is lying on the ground, you can simply cut it up with a chainsaw. However, if half or only part of it has fallen, you have to cut down the entire trunk, and this task requires skill in order to avoid injury. Please remember to use a chainsaw sharpener to sharpen your chainsaw before cutting wood.
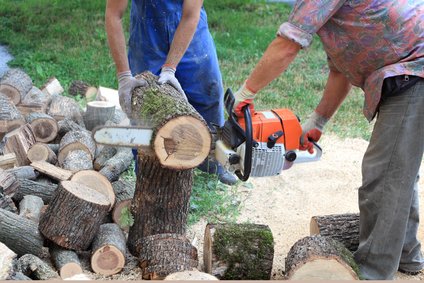
It is a good idea to have someone experienced help you with cutting the tree down, and then you can proceed with log cutting once the whole tree is on the ground. Remember to protect yourself by wearing glasses, hearing protection, and gloves, as mentioned above. It is ideal to have someone work beside you. If this isn’t possible, keep a cell phone on you in case of an accident.
The first step is to position yourself so that your upper body supports the saw. When you stand, spread your feet a little further apart than your shoulder width. You can cut the tree in either an upwards or downwards direction. The most frequently used method is to simply place the saw above the wood and cut down through the wood. However, if the tree or branch is under tension, top-down cutting may cause pinching and the saw will get stuck in the wood. If this is the case, bottom-up cutting is advised. Place the chainsaw beneath the wood and move it upwards while cutting. Plastic wedges will be helpful to keep the chainsaw from pinching.
Start by removing all branches from the trunk. Branches that elevate the tree from the ground should be cut last, as they help to prevent cutting into dirt, which will make the chainsaw blunt. If the trunk has no elevating branches and is lying on the ground, cut it downwards, but leave about two inches uncut. It can now be rolled over and the cutting completed. The size that you cut the wood pieces to will depend on the size of your fireplace/furnace. Two feet long is a guideline. Remember to cut the wood into flat, smooth pieces, so that the wood can be stood up to be split into smaller pieces later.
What if your chainsaw gets stuck in the wood? This is quite a common occurrence, even among skilled wood-cutters. If this happens, turn the chainsaw off immediately. If it gets stuck in a small limb, you can pry the limb away manually by moving the saw up and down until it is free. If it’s still stuck there, disassemble the saw bar from the engine, and then try again. A plastic wedge is especially helpful to prevent pinching when cutting large logs. Once cutting is complete, you can move on to wood splitting.
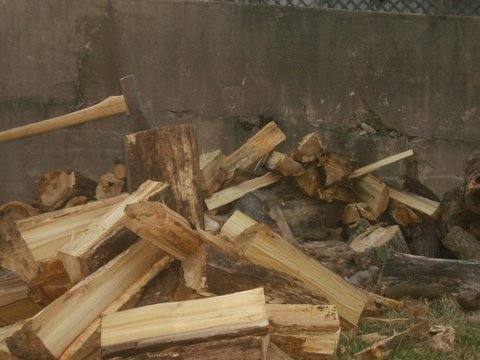
Splitting wood
Small logs from branches may simply be cut and stored for burning at a later stage. However, large trunks of big trees need to be cut into smaller pieces and split apart. A splitting maul, which closely resembles an axe, is a frequently-used tool. The only difference between the two is the blade. A splitting maul’s blade is somewhat blunter than that of an axe, because it is used for splitting rather than chopping. A sharp blade would cause the maul to get stuck, rather than tear the wood apart. The maul may come in many sizes, but the preferable one for home use is the 6-8-pound maul. It is lightweight enough for swift swings, and doesn’t require much effort to swing.
You need an open space outdoors for wood splitting, because it requires some swinging, and split wood may fly in all directions when cut. Children should be kept well away from the site to prevent injury from flying debris. A chopping block or a raised surface is necessary to place the logs on for splitting. The chopping block should be at least 12 inches in diameter and 14 to 16 inches high.
Now, place a log on the raised surface and set the maul on top of the log. Stand with your feet apart at shoulder width distance from each other. Raise the maul overhead and focus your strength on chopping straight down along the grain on the log. It should be a vertical-line swing downwards, rather than a pendulum-like swing. You may not hit the log precisely as you wanted to on your first try. For example, you may have wanted to split the log in half down the center, but the split is off-center. Do not become despondent, because your aim will improve with practice!
Some safety tips for using a wood-splitting maul
It is not difficult to find a good splitting maul, but if you don’t know how to use it properly, you may injure yourself. Below are some tips to help you work with a maul safely:
- Dress for the job. Wear protective eye-glasses, gloves, a long sleeve shirt, pants and boots.
- Keep people far away from the work site, especially small children.
- Make sure the chopping block is large, leveled, stable and roughly a foot high. Splitting wood from this raised surface helps to prevent the maul from hitting your leg or the ground.
- Split the wood from a crack if it has one. Avoid splitting at a knot, because it will require more effort. In case of a knot, switch to the non-knot side of the log.
- Freshly-cut wood is easier to process than dry wood, so the sooner you start with splitting after the tree has fallen, the easier it would be to split the wood into smaller pieces. Those smaller pieces tend to dry faster afterwards.
It is best to shelter the wood out of the rain, but if you stack it outdoors without any cover, proper drainage should prevent water from pooling. Loose stacking will allow air circulation which dries the wood. You should expect to wait at least 6 months before the wood is dry enough to be used. Despite all the hard-work involved, it is time to reap what you have sowed. Now you can enjoy the reward of sitting beside your glowing fireplace during cold winter days. Can you hear the roar of your hard-earned firewood in the fireplace?
Richard Clayton
 Hi there! I’m Richard Clayton, an owner of a gardening blog. I love taking care of my garden. My website (My Greenery Life) is a place, where we can discuss everything about lawn care, DIY gardening and critter control topics.
Read my other articles on Pantry Paratus: