
Homeschool + Bread Baking = Delicious!
Educational bread baking?
Julia from Homeschool Mom Chronicles has been an inspiration to us at Pantry Paratus, we are proud to have her share some of her homeschooling experience here with us. Despite all she manages to get done in a day, she still stopped by today to chat about home education, balancing schedules and of course bread.

One of the things that I like best about homeschooling is that “school” is never closed! Even the most mundane tasks, such as grocery shopping or bread baking, can be a learning experience for my children.
My children love homemade bread, so it’s only natural to teach them how to make it for themselves! But for homeschoolers, such training has the extra benefit of being eligible for school credit. Here is how I give school credit when my children learn to bake bread:
Math: reinforcement and practical application of measurements
Language Arts: reading and following directions; journaling and answering relevant questions in their notebooks
Practical Skills: learning to bake; kitchen safety and cleanup

I require all of my children to learn how to cook, regardless of gender. I want my daughter to bless her future husband and children with scrumptious (yet frugal) home-cooked meals. My sons will probably not be the primary cooks in their families once they marry, but they should still know how to prepare simple and delicious meals. My sons should be able to feed their families if their wives are ill or unavailable, or maybe just to bless their wives and children from time to time.
Because of his youth spent on his family’s dairy farm, my husband was always an early riser. When he wanted the rest of our family to get up early too, he would fry bacon! The delicious smell would waft upstairs and pry us from our pillows. Before long, the entire family would be in the kitchen trying unsuccessfully to snitch bacon from the platter while my husband prepared scrambled eggs and toast. (Somehow, our only daughter always managed to snag a piece or two of bacon from her daddy. Not fair! 😉

Anyway, although my husband didn’t cook a lot, the meals that he prepared for us in love were always tasty and much appreciated. My children and I will always cherish the memories of those meals that my husband brought to the dining table. And I would be thrilled if my sons’ children would have similar memories of their dads in the kitchen.
Bread baking is required in our homeschool

All of my children will experience baking bread from scratch. I always start with having them use a bread baking machine so that the children are (pretty much) ensured of success. The next time, I have them prepare the yeast bread dough using my trusty Kitchen Aid mixer. Finally, I have them prepare homemade bread completely from scratch by kneading the bread dough by hand. At the very least, all of the children will come away with an appreciation of how much work goes into preparing a loaf of yeast bread (and hopefully they will have more appreciation for whoever prepares homemade bread for their families someday).
If my children attended public or private school, there wouldn’t be enough time left in their busy days for such training. I am grateful for the God-given right to “Train up a child in the way he should go, Even when he is old he will not depart from it.” — Proverbs 22:6 (NAS).

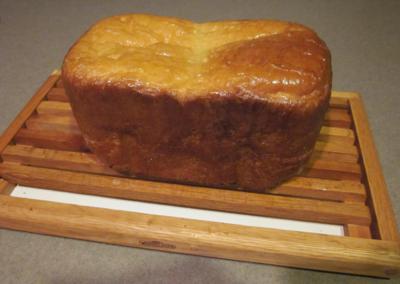
The bread you saw my son make in the above pictures is one of my family’s favorite bread baking machine recipes, Sally Lunn Bread. This high-rising loaf is slightly sweet, with a tender crumb. Whether or not your family homeschools, I’m sure that you’ll enjoy this delicious loaf of homemade goodness.
Sally Lunn Bread (1 ½ pound loaf)
3 tablespoons butter or margarine (Butter tastes best, believe me!)
1 large egg
1 teaspoon salt
1/3 cup sugar
¼ cup nonfat dry milk
1 cup lukewarm water
3 cups bread flour (My favorite is King Arthur Flour)
1 ½ teaspoons instant yeast (I prefer SAF Instant Yeast)
Place all ingredients in the bread baking machine in the order recommended by the manufacturer. Program for White Bread and Light Crust setting (no timer), and press Start.
-OR-
Program the bread baking machine for the Dough setting. After the dough cycle is complete, remove the dough from the pan and place it on a lightly floured surface. Punch down the dough, then cover it with a clean kitchen towel and allow the dough to rest for 10 minutes.
Shape the dough into a 12-inch loaf, and place it into a lightly greased 12-inch Nonstick Bread Pan. Cover the pan with the kitchen towel, and place the pan in a draft-free area. Allow the dough to rise until doubled (about 30 minutes).
Place the pan on the counter while you preheat the oven to 375°F. Bake the bread for 25 – 30 minutes. Remove the bread from the pan and place the loaf on a wire rack to cool. (For a softer crust, brush the hot loaf with melted butter.)
(This recipe originally called for 1 cup of milk. I changed it to ¼ cup nonfat dry milk and 1 cup lukewarm water for convenience and to save money. – Julia)
Hopefully, this post will encourage you to incorporate bread baking into your homeschool curriculum!
Julia
