Whether it is finding joy in simplicity or learning to cope with food allergies–we are all simply doing the best we can. Maybe Pantry Paratus can offer some inspiration.
Even if you keep a spotless kitchen, chances are your pantry could use a little TLC. In my house, a messy pantry often leads to wasted food. Without realizing it, food expires and ends up in the trash instead of on the dinner table.
Organizing can seem like a daunting task, but it’s actually simple once you start the process. Here are some helpful tips on how to tidy up your pantry and keep it that way.
1. Clear out the pantry
Start by taking everything out while checking for any outdated items. Have one pile for items to keep and another pile for things to throw away. You can keep products that are just nearing their expiration or consume-by date for immediate use.
Chaya suggests: the next time you shop at Pantry Paratus, be sure to put the FREE downloadable Annual Pantry Checklist in your cart–a very handy tool!
2. Clean the shelves
Once you’ve cleared out the pantry, it’s time for some good ol’ elbow grease. Use a handheld vacuum to get rid of dust and dirt, and then wipe down the shelves with a damp rag. If you have a walk-in pantry, don’t forget to sweep off cobwebs that may have accumulated in corners or the ceiling.
3. Organize by zones
This is the most efficient way to organize a kitchen pantry, instead of arranging the contents by size. Designate separate areas for food and cooking, with often-used items within easy reach. If you bake a lot, for instance, group baking supplies such as flour, eggs, and sprinkles together. Place breakfast food like cereal, bread, and oatmeal in another corner.
*Chaya suggests: new to the idea of zones? Learn more in this concept in this blog post.
4. Use clear containers
Clear containers let you quickly find what you need and see when supplies are running low. They also eliminate the mess of packaging and boxes. Use baskets or bins for larger items or to save space when they’re stacked together according to category.
Sometimes, you need something and it’s all the way at the back of the shelf. A lazy Susan makes it easier since all you need to do is spin it to retrieve what you need instead of moving things around. Shelf risers, on the other hand, will double your pantry space.
6. Utilize cabinet doors
Make every inch count by hanging over- the-door organizers. You can also mount racks to hold spices, canned goods, and oils.
7. Labels, labels, labels
This helps everyone locate and put items back into their designated places. You can use a label maker or chalkboard labels for any quick changes. Erasable labels are also great for adding opened-by and expiration dates. A cheaper alternative is masking tape and permanent markers.
Check out our Modern Harvest Shrink Wrap Labels–easy to put on and to take off of jars, and they come in 4 super-cute designs. We love these for our pantry, but for craft & office organization, too.
8. Make an inventory
Make a list of everything you have, including expiration and use-by dates. This will help you keep track of your supplies and figure out which ones to use first. Build a template on your computer, print it out, and then hang it on a clipboard by the door. Check your inventory before grocery shopping to see if you need to replenish any stocks.
9. First in, First Out
Implement this rule to avoid food waste. Place newly bought items at the back and the oldest ones in front. This way, you’re less likely to let food go bad.
Writing the expiration dates on cans will also
help you grab next-in-line when cooking.
Check your cupboards at least once a month and stick with this routine. Organizing your kitchen pantry can be fun and stress-free, especially when you get to save more time and money for you and your family.
If you have a big, juicy watermelon, have the little ones strip down to the diaper in the yard and just dig in. Spit seeds, eat it straight from the rind, and hose off before going back into the house.
That is the best way to eat watermelon.
We have some avid watermelon eaters around our place. Even yet, with a food co-op order yielding three very large organic watermelons in the same week, even my kids began to waver on their dedication to the cause. When life hands you watermelon, make taffy!
The word “taffy” is more of a descriptive term for the texture and candy-like result you get from dehydrating watermelon. This is not a true candy or taffy; for a dye-free and whole-foods family like ours, this is an awesome way to treat the kids with candy.
Paraflexx Sheets (this makes cleanup extremely fast & speeds up dehydrating time since the juice will not be re-wetting the trays underneath)
The “How-To”:
1) Quarter the Watermelon.
2) Using a sharp knife, slice the watermelon quarter into very thin slices, left to right (as shown). Doing this in the rind holds it steady for you and means you get the thinnest slices possible. Make sure that you are getting consistently thin slices; too much differentiation will affect the dehydrating time.
3) Slice the watermelon quarter once down the middle (how the knife is positioned in the picture).
4) Cut along the rind to release the triangular shaped slices of watermelon.
5) Dehydrate with the dial set to the low-end of the fruit range. Dehydrate it to your preference, but it will create a thick, chewy candy. You can dehydrate it for an extremely long time and never get this to a long-term food storage dryness.
6) Vacuum seal the candy in portion-sized bags, then freeze until ready to use them! They are good at room temperature for about 3 days.
Since we do not use food coloring, finding cute ways to decorate children’s birthday cakes is a constant struggle for me. I’ve tried a million things, but some natural alternatives leave strange flavors for a birthday cake (I over-did it on the beet juice one year). This is my idea for Bug’s birthday cake. She turns 5 in just 2 months; I have plenty of watermelon taffy in the freezer for this:
If you think of other creative uses, send us a picture or leave a comment!
Summer On,
Chaya
All photos are property of Pantry Paratus; feel free to pin or share them only in connection to this blog. Thanks!
“You don’t have to cook fancy or complicated masterpieces – just good food from fresh ingredients.” ― Julia Child
First of all, I need to share I am so excited to have an opportunity to guest post here at Pantry Paratus ! I have gotten to know Chaya through our blogging connections and I can vouch that she knows her business; and I love that her and her husband (Wilson) support American made products. That being said, I was mulling over what to write for this post. Then it struck me when I was writing my “Secrets to Making Your Very Own Prized Pickles” post for my own blog that the right or correct kitchen tool for the right job is so important and how indispensable some tools are.
For those of you who don’t know me let me introduce myself: my name is Karen Lynn. I am the blog owner of “Lil’ Suburban Homestead” and I am also a Survival Mom Radio Network Host and a Survival Mom Writing Team Member. I write and discuss all things homesteading….my motto is “If you have a home you’re a homesteader.” My husband (The Viking in my life) and I are Suburban Homesteaders on 1/3 of an acre in Coastal, NC. We raise chickens, bees, and supplement our diet from our raised bed gardens, and we are extremely passionate about canning and preserving our food from our garden and supporting our local farmers too.
I was canning up a batch of salsa recently and realized how much I enjoy canning now– and the very act of taking control over the quality of food my family eats and how fulfilling and rewarding it is. I realized it has not always been this way. When I first started canning, I didn’t enjoy it nearly as much but at the time it was a way to stay on budget and preserve fresh produce when I had access to it. We bartered a lot when we first got married. One time my husband bartered HVAC labor for a truck load of corn and, well… keeping food in our bellies with a young family was a top priority. In my opinion, fresh food on the table equals money in our wallets. It was a great trade! Looking back, one of the reasons that I did not enjoy canning is because I often had to sift through cracked hand me down canning jars, and I had to scrape money together for canning supplies. I didn’t have all the correct products to get the job done. For example at first I did not have a canning funnel, or even a canning jar lifter— both of which are worth their weight in gold to a seasoned canner.
Peaches were the very first food item I ever canned. Shortly after, I added tomatoes and corn and all of my products turned out so delicious and fresh I slowly became a canning addict. I didn’t admit defeat after broken seals from using worn old canning jars, broken canning jars that were weakened with age and ending up with my beautiful product ruined. I persevered and oh boy I am so glad I did. What I once did as a necessary requirement to stay on budget now still helps me stay on budget but I have the added bonus of such a fulfilling and rewarding hobby that hopefully I can pass down to my Grandchildren one day.
Slowly over time, I was able to add to my canning collection and upgrade to better jars and better equipment the investment over time which for me took about 5 years to really have the collection of canning supplies and books that I needed, which really turned my attitude around about canning. In addition to having the proper tools was having the know- how via education (which for me was books, and the library at the time made all of the difference). I am so envious today of canners with all of the blogs, facebook groups, businesses like Pantry Paratus, and Youtube. You gotta’ love you tube it makes so much of a difference in how fast one can become a seasoned canner these days.
Fondly,
Be sure to visit Karen Lynn on her own site, Lil’ Suburban Homestead, and let her know that you appreciated her canning chat here on Pantry Paratus!
You so knew I was going to say this one! Experiment, though; don’t just stick to zucchini bread, and if you are—please use chocolate chips! Anyway, I’ve slipped shredded zucchini into cookies, muffins, and regular yeast breads. I’ve also put it into apple cake before, too. Just remember that you are adding some moisture and so you will need to adjust the recipe ever-so-slightly. Don’t be afraid to try something new with it.
2) Soups & Casseroles
Yes, okay…I’m getting the obvious suggestions out of the way. Most of us eat who preserve our own foods eat so much soup in the winter that we like the summer break from it. Truthfully, I haven’t made soup in over a month and don’t plan on it during zucchini season. I did, however, make great cabbage rolls and rolled lasagna noodles—both dishes lend themselves to hidden zucchini is shredded form.
3) In the freezer— for future baked goods, soups, & casseroles.
Cuz’ yeah, I already said. No soup for you…at least, not in the summer when fresh, crisp garden veggies abound! No prep work needed; I recommend peeling them before shredding. Then place the shredded zucchini into cheesecloth and squeeze the ever-lovin’ moisture out of them; better choices are the stainless steel chinois or the jumbo potato ricer, which does wonders with less wrist-and-hand action. Use a vacuum sealer to ensure that they are air-tight before freezer storage. Anything inherently wet like zucchini is ripe for freezer burn, so taking a few precautions will prolong the freezer life.
4) Side Dish
This is the last “well, duh” answer, I promise. But there are multiple things to do with this! Read One Ash Farm’s recipe for sauteed summer squash here. These veggies also have a long history of being deep-fried, oh-yeah….I’m having a Midwestern craving now. You can use a spiral slicer or a julienne slicer (triple peeler) to make “spaghetti”—a common paleo take on the old Italian fave. You can slice thinly and serve over rice noodles, along with chopsticks and a dipping sauce made of soy sauce (we use Amino Acids—much healthier) and peanut oil. An old Japanese friend taught me this one and it’s brilliant in simplicity and flavor. It can be rather fun watching others splash their noodles attempting to “dip” with chopsticks.
5) Powdered
This mixes well into pastas or chuck it into the crock pot for a ‘little-of-this’ soup or stew. Since zucchini has a substantial amount of Vitamin C, Manganese, and the B12 vitamins, it’s a great food storage item! Pantry Paratus has a great post about vegetable powders that explain it in detail. Here is a warning, though; because zucchini is very moist, you will get a lot of shrinkage. Use paraflexx sheets with shredded zucchini, it will keep the mess down considerably.
6) Zucchini chips—my favorite use!
With a long life history of pre-processed junk food, I suffer from uncontrollable cravings at times. I have zero self-control with potato chips; I cannot go near them. So instead, we slice zucchini into medallions, lightly salt, and dehydrate! Wow! They are great just like that, but also make a quick appetizer when arranged on a tray with dehydrated tomato slices and a bowl of homemade ranch dressing.
I have yet to try this but am super-excited. I once had an addiction to gummy bears and have yet to find something that satisfies that craving since switching to a whole foods diet.
8) Pickled & Canned
Not many people do this, but I don’t know why. Tasty! Books like Put ‘Em Up! and Pickled Pantry have entire sections devoted to zucchini, or summer squash.
9) Barter Economy
Maybe you have too much zucchini, maybe someone else has so many flowers, they’d share a bouquet with you! Or perhaps they overplanted tomatoes this year (is that even possible?) or something else that did not do so well for you. Maybe an avid baker will take all of your zucchini in exchange for a couple of loaves of zucchini bread in return.
10) Gifting the Ungardened
This may seem similar to bartering, but no. There are those who need to be brought along slowly to the joys of home gardening, to the flavors and smells of living, nourishing food! And there are those who have knee surgery or arthritis, caregiving responsibilities, or unemployment who would see your plethora of zucchini as a major blessing in their lives.
Keep Producing, Preparing, & Preserving!
–Chaya
Photo Credits:
Several photos were courtesty of other great websites; click on the photo to visit them now!
All other photos are property of Pantry Paratus–please feel free to share or pin them in connection to this blog. Thanks!
My Ongoing Battle and a Quiz from Yale Researchers
Proviso: Nothing in this blog constitutes medical or legal advice. You should consult your own physician before making any dietary changes. Statements in this blog may or may not be congruent with current USDA or FDA guidance.
Well, sort of a shrink. Not an official one; I was a licensed psychologist’s assistant, which means I did the work and he signed his name on the bottom so we could bill insurance. Oh and the malpractice insurance was rather high. Probably not as high as it would be if they had malpractice insurance for parenting, which is my current occupation. I have a master’s degree in psychology, which qualifies me for absolutely nothing, by the way, except having lots of opinions about the motivations, fears, and comforts people experience in daily life.
Today’s blog comes from life experience, not from a stuffy textbook.
I have an addiction.
Chocolate.
As with most addictions, I should really say that I am a recovering addict because even though there are times in life when it seems I got ‘er licked as it were, it will once again rear its ugly (melty, gooey) head when I am least vigilant.
Long before children, long before that crazy psychology degree actually, I discovered that people knew me for my love of chocolate. When I quit a job to go back to school, the co-workers went in together and bought an insane amount of it for a going-away present. In that same week, my childhood-best-friend’s father was flying through our town. We met him for an hour in between his flights, and he handed a bag of chocolate to me:
“I wanted to get something for you, but all I could remember was how much you loved chocolate.”
Wilson snickered. Sure, laugh it up, but I don’t see you refusing our chocolate stash, which now overflowed the pantry shelf and onto the counter.
I then read a really dumb book, you know the kind. The author had one brilliantly valid point to make, but after making it on the first page he spent the next 212 regurgitating it. The book was about the connection between food and love (or something like that) and how we often turn to food to fill an otherwise void area in our hearts. So I did the hard work of self-examination, and then swore off chocolate.
The first week was the hardest; it was also my birthday week (my timing has always been like that). My best friend surprised me with a chocolate cake (hey, I wasn’t quick to denounce chocolate out loud lest someone hold me to it).
Okay, so the NEXT first week was the hardest.
Over time, I quit thinking about M & Ms all of the time like a junior high crush. Yes, I broke off my relationship with chocolate. And then it got to where I could even be in the same room with it at social functions. Eventually, I was enjoying alternative foods more and realized how much I was missing out with my monochromatic obsession with the Dark. And one day I realized, I much preferred the flavors and textures of other offerings and I was not even missing it, really. I knew I was going to be okay. Do you know that it took over 3 months to get there?
Am I addicted?
Well, apparently, I personify chocolate and have been known to hug it.
And the muppet to which I most closely identify is Cookie Monster.
I did eventually allow chocolate back into my life, but never in the house (word on the street was that Wilson had his own private hiding place for it). I could eat a modest piece of someone else’s cake, or a scoop of gelato. This was a healthy relationship.
Today as I write this, I am distracted by chocolate. I am– as I occasionally do– fasting it. I do this in part to see if I can live without it. If I cannot, then I need an intervention. I am confessing it; I need an intervention. My timing is poor; there is chocolate chip cookie dough in the fridge and I’m making a very chocolatey cake for my son’s birthday in a few days.
So where does this obsession with the beany-brown bar come from, why does it plague women across industrial nations? Can’t I just have my Ghirardelli’s and eat it too? Am I really “addicted?”
Harvard Medical School said that yes, I am addicted. Well, they were not talking to me personally, but I do meet the criteria they set forth below.
There are three essential components of addiction:
intense craving
loss of control over the object of that craving
continued use or engagement despite bad consequences.
By that definition, addiction can move beyond chocolate or coffee, and can even mean that bag of potato chips or those choco-mallow-puff-fluff some people call breakfast.
Emotionally, we may use food as a reward (i.e., “I’ll eat that after I clean the kitchen”) or to alleviate emotional distress (i.e., ordering pizza to overcompensate for a bad day). The emotional reactions are probably first in the physiological chain reaction that ensues, but there is indeed a physiological response in the body to these foods! These foods affect the blood oxygen level and can be responsible for the release of dopamine very similar but on a different level than drug addictions (Gearhardt, et al, p. 809). In turn, the dopamine plays with Leptin levels, the chemical (peptide) regulator that alerts you that you are full (Grosshans, et al, p. 530). Leptin levels can change without taking a single bite, but by merely seeing a picture of a juicy burger or a candy bar. Just as food affects us psychologically and physically, it can also affect us behaviorally. It determines what we purchase when, and whether we are going to finish the to-do list to get our Pavlovian reward.
What This Means
Well, I suppose we are all in good company, if the line at the local Starbucks or the annual revenue of chocolate companies is any indication. The obvious first step is identifying foods that create a psychological, behavioral, or physical reaction in us. If I know that chocolate is my kryptonite and that by simply seeing it my body undergoes an addictive reaction, I am better prepared to guard myself against it. Remember, Harvard said that an addiction can be partly defined by our continuance of something harmful. And consuming entire bags of hydrogenated potato chips is not exactly in my best interest (no, I’m not a medical professional but I think we can call this one accurately). So, for me, it means never bringing those chips into my home. Ever. I also have very limited exposure to a television screen –we don’t own one—and so that Wendy’s Frosty commercial will therefore not entice me to jump in the car and indulge. I remember doing that many years ago!
Sometimes we need to look in the proverbial mirror to reexamine where we stand with things. I found the Yale Food Addiction Scale for you to use as your mirror, if you want. I give it to you in the spirit of self-reflection, not as any form of medical, psychological advice. There is no rating given at the link above, but it might be helpful to fill this out and take with you to your next medical appointment for a professional to evaluate.
I cannot set forth a plan to help you overcome a food weakness. You could benefit from nutritional counseling and medical assistance if this is affecting your weight, health, or quality of life. But if you find yourself licking the lid to the ice cream carton and think, “golly…I did it again,” I hope this quick insight helps you. Let’s make conscientious food choices so that we can live nourished lives, inside and out.
On the Long Road to Recovery,
Chaya
Proviso:
Nothing in this blog constitutes medical or legal advice. You should consult your own physician before making any dietary changes. Statements in this blog may or may not be congruent with current USDA or FDA guidance.
Gearhardt AN, Yokum S, Orr PT, Stice E, Corbin WR, Brownell KD. Neural Correlates of Food Addiction. Arch Gen Psychiatry. 2011;68(8):808-816. doi:10.1001/archgenpsychiatry.2011.32.
Grosshans M, Vollmert C, Vollstädt-Klein S, et al. Association of Leptin With Food Cue–Induced Activation in Human Reward Pathways. Arch Gen Psychiatry. 2012;69(5):529-537. doi:10.1001/archgenpsychiatry.2011.1586.
Photos:
“Just one, please!” (hand on cupcake) is by Korona Lacasse (cc), changes by Pantry Paratus.
Be sure to visit the other fabulous host bloggers or sponsors participating in this giveaway. Although I labeled the items coming directly from our store, the bloggers below are the ones who contributed to the overall cost of them, and are offering out the other prizes mentioned.
Amazing Graze Farm I get all of my Lilla Rose clips from her (and I have four of them!). She has great skillet meal recipes on her blog, too, as well as a consistent dose of encouragement.
Faulk FarmsteadCome here for an honest approach to homesteading and for “how to”!
Good Not Perfect The name says it all; this is aguilt-free, realistic approach you canfeel good about.
Learning and Yearning I routinely read this blog for gardening help and inspiration.
Reformation Acres An amazing cook (with beautiful photographs), an excellent mother, and a veteran homesteader with great advice.
Schneider Peeps Practical Life, practical kid tips, everyday help. Yet another blog I love to read in a spare moment.
The Organic Kitchen We’ve featured her patio garden before; she blends her story with beautiful photography, recipes, and so much more that you’ll enjoy. Get to know her.
Timber Creek Farm Everything from animal care to preparedness to the importance of the local farming community–I love Janet from Timber Creek Farm.
Trayer Wilderness Tammy and her “mountain man” are very relatable, down to earth people who live off-grid and share their experiences with us.
We Got Real We cannot compartmentalize our lives and motivators; this is the place to go to learn real food, natural homemaking, and to hear how it is all driven by her passion for Christ.
Your Gardening Friend An extremely readable “how-to” that encourages you to get your hands dirty.
This giveaway is open to all USA residents. This giveaway ends Monday, July 21, 2014, at 11:59pm Eastern Time.
**If you sign up for the FREE email subscription the entry will NOT count unless you’ve gone into your email inbox and clicked on the link activating your subscription
We have a family argument about this recipe: my husband has spent much time in The Desert and says that these do not taste “authentic,” even though he loves mine. I believe that they are extremely close to my gustatorial memories compiled from many ethnic meals throughout the years. I believe the word “falafel” is as varied as the term “pasta” may be, connoting different spices and presentations in different places. But then again, I never let the wordauthenticitykeep me from making delicious meals based upon the best of all cultures.
Those of us who have sworn off CAFO meat must live within a prescribed food budget are constantly scrambling to fill our tummies with meatless meal alternatives. The key is the full tummy. This recipe fills the tummy– the house with delectable fragrances common to Middle East cuisine. Your dried bean food storage never tasted so good!
You will use both lentils and chickpeas (garbanzo beans, same thing). In our house, I just have to make falafels when I decide to make homemade pita bread (here is my recipe)!
Why These Two Legumes?
The geek-free answer is because it’s downright tasty.
The geeky answer comes down to the nutritional facts. You are packing a serious punch with this combo! The lentil registers at half on the Glycemic Index than the chickpea, but the chickpea is a complete protein since it contains all 9 of the required amino acids required for that designation.
The chickpeas are high in fiber and have a healthy iron content, whereas the lentils are high in Vitamin C, Manganese, and Folate. These two legumes will balance each other in flavor and texture as well as their various nutritional compenents.
You have some choices with your lentils; I prefer red because they are frequently used in Indian food and have a sweeter flavor. Green work well, though, and have a nuttier flavor. If brown lentils are all you have, try them, but they can be a bit blander and change the color.
The Night Before (10 minutes tops)
*Soak 2 cups of lentils and 2 cups of chickpeas, mixed, in warm water.
*Take your older, stale homemade bread leftovers and pulse into bread crumb using your spice (coffee) grinder or food processor. If you make the recipe in the quantity listed below, you will want 2-3 cups of bread crumbs. I have also used panko, but your own homemade bread will give you more nutrition (just make sure they are thoroughly dry; lightly toast in dry skillet if not).
2-Legume Falafels
Makes 16-20, depending upon size
How many it feeds depends upon how you serve them!
Prep Time: 5-10 minutes
Cook Time: 25-30 minutes
Preheat Oven: 350°
Ingredients:
2 cups soaked lentils
2 cups soaked chickpeas (garbanzo beans)
2 Tbs fresh parsely (about 3-4 sprigs)
1/2 tsp All Seasons Salt
1/4 tsp cumin
1/3 cup broth or water
Enough bread crumbs for coating
Steps:
1. Rinse all of the legumes.
2. In a food processor combine 1/2 of all of the ingredients (two batches makes this much more manageable): 1 cup lentils, 1 cup chickpeas (or 2 cups total of the combined mixture), 1 Tbs parsley, 1/4 tsp All Seasons Salt, 1/8 tsp cumin, and some of the water.
3. Once the mixture is pureed into something similiar to hummus, scoop out into a separate bowl and repeat the process with the remaining ingredients.
4. Using a large spoon, scoop out enough to roll into a ball that is between 1″ to 1 1/2″ in diameter. These should hold together very nicely; if they do not, try to squeeze out excess moisture in your hands.
5. Roll the falafels in a bowl of bread crumbs, and then place on an ungreased cookie sheet*.
6. Bake, uncovered, at 350°, for 15 minutes. Turn them all over to the other side, and bake for another 10-15 minutes (the bread crumbs should brown nicely).
*If you know you want to serve them in pita bread, you might want to make them slightly flatter; it will take extra cookie sheets and you should monitor the cooking time.
To Serve:
* In Homemade Pita Bread, with Tahini Sauce, tomato, and watercress or other greens
* Quartered and in a salad–great use for leftovers
*With a homemade creamy ranch dressing sauce (also great with the leftovers!)
*Use them as the main course, an appetizer, or side dish
*To Reheat: warm your cast iron skillet and lightly toss them for 2 minutes
Sources:
Self Nutrition Data was used to analyze lentils here, and chickpeas here.
This happened in a bad kinda’ way at our place. Our kids—who have never been subject to frozen fish sticks or to a gelatinous mass of Wonder Bread—had become food critics. I’m watching some major improvements take place; we’re having a real turn around. From one parent to another, I realized that I need to share my theories with you as to how it is getting better, just in case you have experienced this too.
Wardee from GNOWFGLINS enjoyed this post and so we are a guest contributor over there today! Be sure to leave a comment over there, letting us know what tricks and strategies help your family mealtime contentment.
A small working farmstead in Eastern Maryland not far from Washington DC . . .
We recently had an email exchange with Sally Fallon, and we wanted to share some news from the farm with you! Wilson had the pleasure of spending time on the farm firsthand and has full confidence in Sally and Geoffrey in regards to caring for the health of their animals. They have made some shifts in cow feed, finding a very creative alternative that provides the necessary nutrients for their optimal health. It was such an unusual solution, that we wanted to share it with you…dried coconut meal! They are having much success with it, and you can read more about their decision and the unfortunate event that led to finding this creative and natural, whole-foods solution.
Meanwhile, we wanted to share this post from 2013 to give you a feel for their operation!
Okay, so I am a sucker for farm tours. Some people collect decorative spoons, shot glasses or bumper stickers from places that they visit—me, I collect mud on my shoes because I want to see how other farmsteads do it.
Recently on a trip through Washington DC for business, I had the chance to stop by a particular farm in less than an hour south of the nation’s capitol called the P.A. Bowen farmstead in Brandywine, MD. It is a working farm and if you go by the Joel Salatin metric that “a farm should be aesthetically and aromatically, sensually romantic” then the P.A. Bowen farmstead is check, check and check. Some farms may stick out in your mind as special because they sell something that you really like:
Some farms are special because you got to hold your first baby livestock animal there or stepped in your first cow patty or maybe, like me, you got to milk your first cow (here I am doing just that for the first time prior to having to apologize to the cow):
For us at Pantry Paratus, this farm is VERY special because it is home to Chaya’s hero—Sally Fallon Morell, who is of course president of the Weston A. Price Foundation. It was kind of like the time I had the opportunity to visit Polyface Farms and to meet my hero, I could not pass up the opportunity to come to the farmstead on a day that Sally was giving the tour in person and was going to be signing books afterwards:
The farmstead is historic, beautiful, quaint, modern, awesome and a source for good eats all-in-one. Sally Fallon Morell and her husband Geoffrey run the farmstead as a for-profit dairy that makes pretty amazing cheese. So good in fact, that Chaya will not let me come back from any trips to DC in the future without it from now on I am sure. The whole dairy operation is amazing and very clean. The milking parlor is built as a New Zealand style where the cows are up on a flat platform and the person milking is in a sunken walkway behind the business end of the cow in a standing position as opposed to hunched over.
Afterwards, the whole thing is washed downhill out the door
All of the “waste” water is collected in that tank and sprayed onto the pasture as fertilizer.
The sign is from Geoffrey’s original dairy in New Zealand (this whole farm is so cool):
The milk is collected via a co-pulsation system into cans (which is not common in most dairies) to maintain the very hygienic standards that good cheese makers demand. I got to peak into the cheese making area which is amazingly clean; a necessity because making cheese is like making bread—it is a controlled experiment.
The farmstead produces (soy free) poultry and eggs, silviculture/pasture raised pork (nitrate and nitrite free!), pasture raised dairy products and pasture raised beef. Raw milk is not legal in MD, but cheese made with it can be sold after 60 days of aging—did I mention that it was amazing?
Napoleon the boar (I did not see Snowball anywhere):
Domingo, the Jersey Bull. All the cows are Jerseys and named after Opera stars:
You can watch this video to get more of a view of the farm:
The “waste” product called whey from the cheese making is pumped into this tank and fed to the pigs (much to their delight):
The chicken feed is soy free and ground on site. The chickens are raised on pasture for the best tasting eggs:
Sally, the greatest farmstead tour guide ever. Does anyone know what that is she is standing next to? Leave your guess in the comments section:
The small strawbale pig shelter is blocked on the prevailing wind side (open on the leeward side) which is a nice juxtaposition to the old tobacco barn which was built facing the exact same way for the same reason:
All farms are special, and I have gotten to visit some pretty cool ones in the past to which I can say that I have learned a lot from every time. Yet the P.A. Bowen farmstead is special because of what it produces and who produces it. Thank you Sally Fallon Morell for all that you do for real food!
Nothing in this blog constitutes medical advice. You should consult your own physician before making any dietary changes. Statements in this blog may or may not be congruent with current USDA or FDA guidance.
This has been in my repertoire since early marriage, so I’ve probably been making this for about 15 years. I do not know exactly where it came from, but it has morphed into something different as all great go-to recipes will do; part of that process is reflected in the traditional food ingredients that make this wholesome and healthy. This has a savory-sweet flavor with a tangy aftertaste that lends itself to wanting seconds. The apples are sweet enough to flavor the potatoes and chicken as it simmers. There is no mention of potato in my title–the title would quickly get too long–but they are the unsung heroes. They stretch out your pastured chicken in the recipe, allowing you to feed more people for less-per-plate.
Oh, and although eating white potatoes on the paleo diet is controversial, some might consider this paleo-friendly or easily adapted to be such. If you are paleo & adapt this, let us know what you did & how it turned out in the comments!
Honey-Mustard Chicken n’ Apple Skillet
Total Time: about 30-40 minutes (less if you overlap steps)
Feeds 6-7 (if they’re hungry, or you’ll have yummy leftovers)
Do ahead steps: boiling potatoes (step 1) and making the dressing (step 5)
1/3 cup green onion or diced red onion (both are great)
3 TBS apple Cider vinegar
3 TBS honey, liquid
3 TBS stone-ground (or German) mustard
Salt & Pepper to Taste
1) Boil the cubed potatoes (whole potatoes take nearly 1/2 hour, but cubed should be about 20-25 minutes) until you can poke a fork through them.
2) When the potatoes are nearly 10 minutes from ready, melt butter or heat olive oil in large cast iron skillet. Brown chicken for approximately 5 minutes. If using red onion, carmelize now.
3) Add cubed apples to the chicken and cook for about 2 minutes more, stirring frequently.
4) Drain potatoes and add to the chicken/apple mixture. Stir and allow the potatoes to brown as desired (between 5-10 minutes more).
5) In a separate bowl, mix the apple cider vinegar, honey, and mustard.
6) Turn the heat off of the skillet and stir in the dressing until coated. If using green onion, stir in now.
Grass-fed beef jerky that can keep pace with your life
The New Primal sent four packages of their grass-fed beef jerky to me, and here is my review. They did not compensate me in any way, nor did they have a clue what I’m about to say here.
They sent four flavors to me: Original, Spicy, Mango, and Pineapple.
Once while in line at the grocery store, my over-honest toddler told the clerk, “My mommy says that stuff (pointing to the “meat sticks”) is yucky.” I was slightly embarrassed but I couldn’t exactly reprimand him, could I? Finding a quick high-protein snack is difficult for those of us who care about GMO, ethical harvest, natural animal practices, and….flavor! I gave up on any jerky that was not my own a loooong time ago. And even then, mine isn’t all that great.
The Ingredients: This is why I even agreed to do a review in the first place. They only use grass-fed beef. They marinate and smoke the meat using nourishing ingredients and natural processes. Oh, and it is gluten-free. The trail packs are like nothing else in flavor, that I promise. They pair the marinated beef with raw nuts and fruits. Each trail pack has 18 grams of protein per bag! You can hike that trail or survive that traffic jam.
For us, it was getting through all-day air travel (we refuse, flat-out refuse to eat anything from an airport and always bring our own food), surviving an amusement park, and spending a day on the lake in a canoe. Those were the adventures we chose, but this is one of those great “choose your own ending” adventure stories. What’s yours?
I asked the company a few questions. I asked, “With all of the health food brands on the market, I see nothing out there that claims to be grass-fed jerky. Can you tell me exactly where New Primal picks up where others leave off? What makes it different?”
They responded:
We’re committed to only using 100% Grass-Fed, Grass-Finished beef that are raised without hormones and antibiotics because that’s the way nature intended it. We also don’t see the need to add loads of salt, sugar, or any ingredient you can’t pronounce which is the typical model in this category. The New Primal doesn’t use sugar in our marinade and have 50% of the sodium content of the average bag of jerky on the market. There’s no reason jerky should be a gas-station snack. It can be clean, great tasting, and a quality source of protein.
‘Nuff said.
The Packaging: Very sleek, easily conforms to our day-hike bag, to the carry-on, and I slipped one in my purse for a mid-day snack on the go. Each flavor is easily identified by its own packaging.
I’m obsessive-compulsive about label reading; since a kid has a corn allergy & corn has over 180 names, I read every package at least 3 times before letting him eat stuff. I know-that-I-know-that-I-know none of their jerky contained the allergen, and yet I was slightly annoyed at trying to read the yellow package (the mango) for the third time because the white print was barely legible. I recommend checking out the ingredients list directly on their website and let the OCD go. Really. Relax. You read the label already. These people are OUR people, the traditional food people, relax. I did tell the company that this was my singular complaint, and they said that it was simply a bad batch of packaging from the printer and that the problem was remedied. That SO happens to everyone.
The Texture: I dragged that jerky around with me everywhere, quite literally. I left it in the car, which was fluctuating to extreme temperatures in our Montana spring. I carried it around in a backpack at a Florida amusement park in 95 degree heat. It was downright abusive.
The texture is far tenderer than my homemade jerky. My kids even made the comment, which resulted in an eye roll from me, I confess. My son thought the original flavor was too greasy, but I think it had to do with the abuse we gave that package—nothing else was “too greasy” at all, and all of it was delicious.
The Flavor: The sweetness of the meat itself is a common denominator, and the meat flavor is consistent from bag to bag. The pairing with pineapple, mango, or nuts will be preferential but we liked them all!
I saved the spicy for last because I am a wimp. It has a sweet-spicy flavor (probably due to the honey and pineapple juice in the mix), so it was more like “strong-tangy” than spicy. I mean, I ate the entire bag by myself and my lips had that tingly feeling. It wasn’t caliente.
The mango was my favorite.
The Price: It’s hard to gauge the price of anything unless you do some comparison shopping. I pulled up the most common brand name online (Jack Link’s) and saw, penny-for-penny the same price. I then read the ingredients list. It has MSG, GMO soy, added nitrites, and GMO corn going by 3 aliases. It had some other stuff like preservatives I’ve yet to research. That stuff is never invited into my home. Or my backpack. Same price.
I was more surprised than you know about the “same price” thing. So I asked, “The nasty stuff on the market (like the “meat sticks” in the checkout line) is all way over-priced, in my personal estimation as a consumer. You give real nourishment at a very similar price-point to theirs. Still, jerky seems to be somewhat of an impulse buy for many people, something they get at a quick gas stop or when their picking up sunscreen for a day at the beach. Why should beef jerky be a conscientious, plan-ahead purchasing decision?”
They answered:
It’s without question that a protein rich diet benefits personal health in many ways. Jerky makes for the ideal “portable protein”. It’s the perfect snack in-between breakfast and lunch or lunch and dinner and can save your life in traffic or while traveling. It doesn’t have to be exclusive to the hiking trip and should be something that we keep a few packs of in our pantry, briefcase, or purse for those moments we’re tempted to hit the vending machine at work, etc.
Healthy, nourishing protein can be hard to come by in a hurry. Put a pack of this stuff in your bag on your way out the door and you won’t be tempted to “stop for a quick bite” that is only going to sicken you later. You’ll also save money by doubling the nutritional value of each penny you spend. You have a busy life and you need real nutrition to keep you going; this stuff can keep up with you!
You can get The New Primal Grass-Fed Beef Jerky directly on their website or you can check out their listing of who sells New Primal near you by visiting http://thenewprimal.com/
Photos are either property of Pantry Paratus (if the jar logo is present) or are property of The New Primal and used with permission.
This is the time of year when take stock of the freezer stash and pantry stock of those foods we wait all winter to come back into season again–berries! To make room for the plentiful harvest of this year’s berries, I do need to eat up some of last year’s raspberries. I hoarded them. I froze more than I normally do and I was glad for it–a raspberry smoothie on a frigid Montana January morning somehow reminded us that winter does not last forever, that Spring would once again come.
Likewise, the girls are laying their beautiful brown eggs and this is our favorite use for those.
I grew up with savory omelets and still love those, but my kids are too caught up on the textures of carmelized onions and cooked green peppers to enjoy them as much as I do. This omelet has them all asking for more. I have made it with other types of berries but I must confess that raspberry is the family favorite.
Tips:
1) Start with frozen berries. Use a berry that will naturally spread its juices through the omelet, like a sliced strawberry, raspberry, or blackberry. Firmer berries do not have the same effect.
2) Use real cream in with the egg if you can get it; it gives the end result a deeper flavor not too unlike a custard.
3) Try Sucanat if you usually use brown sugar. Sucanat is minimally processed and is much better for you; if you have yet to try it, you will be pleasantly surprised at how well it works in all of your brown sugar recipes. And besides the health factor, you can feel good about something that is organic, fair trade.
Recipe: Berry Omelet
Ingredients are based on a 12 inch cast iron skillet & feeds 4 (because they are 4 big eaters, but it might feed more).
8-12 medium eggs (based upon how thick you prefer your omelet)
1/2 cup cream
2 Tbs Butter
1) Melt butter in your cast iron skillet. Don’t scald butter, but let the skillet get nice and hot.
2) Briefly whip the eggs and cream. Pour into skillet.
3) Lower heat to medium. As the eggs start to firm up on the bottom, use your spatula to gently lift the sides of the omelet to allow the liquid eggs to flow underneath. Repeat this as often as necessary until the liquid egg on top has drained towards the bottom.
4) When the eggs are firm (no more puddles forming on top), sprinkle sucanat on 1/2 of of the eggs in a thin, fine layer. Spread the berries on top of that.
5) Fold the plain half of the eggs over onto the sucanat-berry mix. Turn off heat. Let it sit there for about 2 minutes more to warm the fruit.
Apart from emails selling me the latest miracle cure, that is, nearly all of the emails are a back-and-forth with someone who I call a friend. Krystyna Thomas from Spring Mountain Living, do you know her? Oh, I hope so. She writes great, motivating stuff like, “13 Reasons Why You Should Can Your Own Food.” They are fun to watch from a distance because they are just slightly crazy, and they are great to know personally because they are sincere, generous, and loyal idealists…they live what they believe and they just might encourage you to stay the course on your journey to self-sufficiency, too.
She and I talk about three subjects at once, at any given moment. It would make our husbands dizzy. But among those conversations are practical homesteading how-to. She recently threw a bunch of questions my way, and whether or not my answers are fit for public consumption is debatable. But let it be said I shoot straight. I suppose, knowing what an encourager she has been to me, it’s easier for me to let my guard down and have a casual conversation about Pantry Paratus.
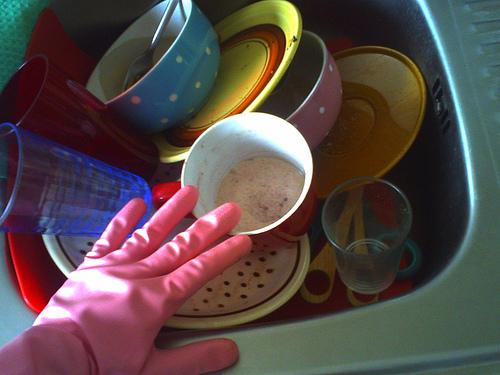
We want delicious, wholesome food. We also gaze longingly upon the family playing a game together after dinner while we are….you guess it…decked out in Hazmat suits and hosing down the pre-dinner kitchen disaster.
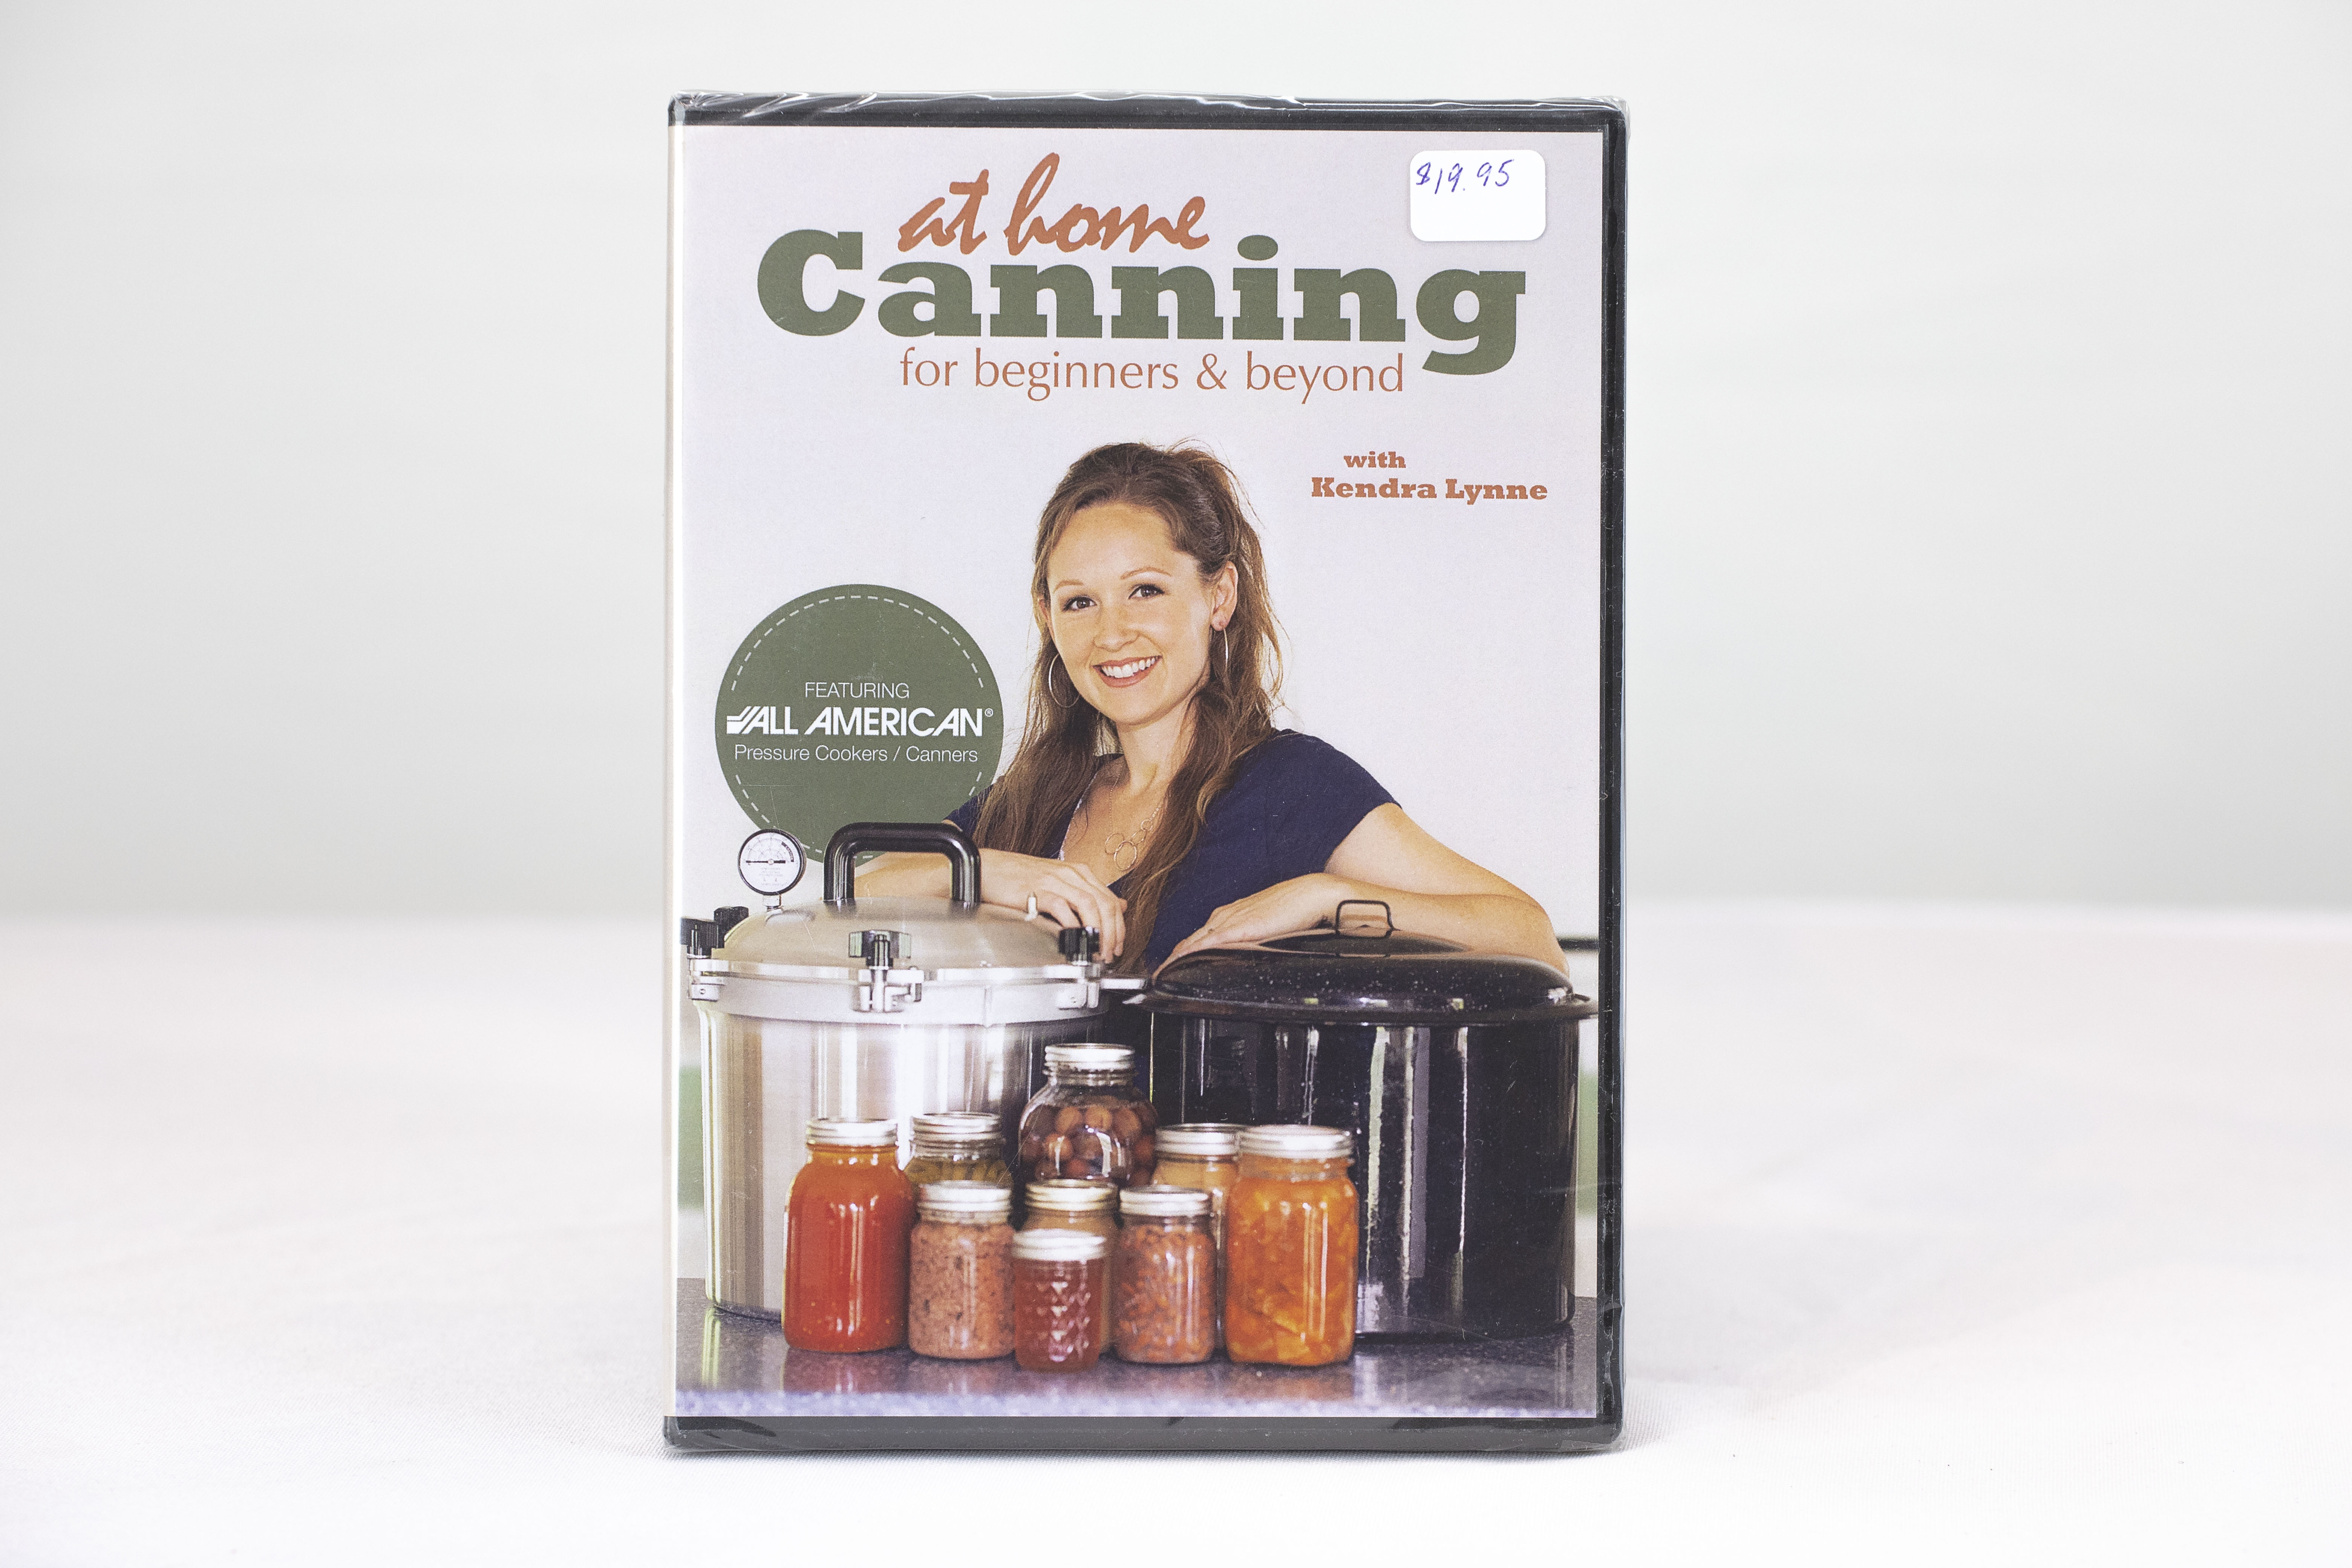
At Home Canning for Beginners & Beyond with Kendra Lynne
This video usurped my old favorite. In the first 5 minutes.
Before I had the joys and heartaches of having my own homestead, I lived vicariously through the Homestead Blessings video series…and promptly found some ankle-length linen skirts at the local thrift store. The West ladies fostered my romantic view of many of the lost kitchen arts that I had yet to reclaim for myself, which increased my willingness to try them for myself. I was quickly impassioned when I saw the health of my family improve nearly overnight and when I had the joy of “something tangibly accomplished” that few baby/toddler moms get to experience. I still recommend these videos for young girls and for encouraging women to think about some lost skills as both beautiful and useful additions to daily life. But the Homestead Blessings video is no longer my favorite. Enjoyable to this day, but not my fave.
Starts with Safety
Kendra never fails to emphasize safety and starts with it every single time and throughout each recipe. This ensures that you produce a healthful product without worries. Since this video starts with safety, you will never have to second guess yourself or our finished product. Romantic notions are nice and all, but botulism not-so-much. Focus on the mechanics to get the safety rules learned, and you will see your confidence improve immensely, too. Start with this video and start with safety.
Matter-of-Fact
As someone who was <cough> blessed with too much personality (my way of saying “loudly ADHD”), I admire Kendra’s ability to stay on-point. She is succinct and clear in her communication. Awesome-possum for the beginner and experienced alike who are not watching the video for lazy couch time, but who are ready-rearin’ to go into the kitchen instead. Let’s get to the point already and make some apple jelly! Yum!
Warm Personality
Okay, so after I said she was matter-of-fact, I felt I should clarify that Kendra Lynne is certainly not a robot. She warmly invites you into her pristine kitchen for a morning lesson on canning how-to. She talks about the farmer down the road that barters with her, and she is very conversational. Her winsome smile and delightful personality shine through, but they do not distract from the information either.
For Beginners & Beyond is True
I have personally only canned for just under the 5 year mark, but am experienced in a wide variety of foods and have the pressure canner out nearly weekly. I can the springtime foraged foods (like pickled onion blossoms, for instance), the summertime harvest, the late summer harvest (such as pickled eggs, apples, pears, and squash) and the wintertime boon of chicken broth and canned meats. Indeed, though my experience in years may be few, my weekly kitchen time is excessive to say the least. I learned some things. I’ll prove it, here are just a few of the things I learned:
1) The reason All-American says not to use a pressure canner on the glass top stove has nothing to do with the safety procedures at all, but only with protecting your stovetop—so if you stay with a canner that is no bigger than model 921 and do not slide the canner around or drop it, you are perfectly safe.
2) Do not boil your metal lids, only simmer them, because boiling them can ruin the rubber seal. This was a “well, huh” moment—I hate using metal lids and much prefer Tattler, partly because the metal lids have historically had a high failure rate for me. I am now wondering if this is why!
3) When canning something greasy, use white vinegar instead of plain water when you wipe the rim. Okay, this one might seem obvious but I never thought of it!
This video was nearly 2 hours long and didn’t waste a minute of it. You can watch it in its entirety, which I highly recommend for the beginner, or just pick the section that applies to the harvest flooding your kitchen. She made something like 12 different recipes in this single video–it was rather impressive.
Here were specific recipes covered:
Apple Jelly
Apple Sauce
Blueberry Pie Filling
Beans & Meats
Spaghetti Sauce
Grape Juice
Green Beans
Meals in a Jar (including chicken soup and chili)
I appreciated the fact that she started with water bath canning and did a thorough job with pressure canning too. In fact, I really cannot say anything negative at all about this video. She did state the pressure amount (such as 10 lbs) firmly for specific recipes, but it should be noted that these do vary with your altitude. No worries, though, she does tell you to double check the chart in the book that accompanies your canner at purchase.
Do not hesitate to get this one if you are new to canning (or even more seasoned): it’s worth the investment to boost your confidence and abilities in the kitchen before you get started.